Wednesday, December 8, 2010

Filling In The Blanks


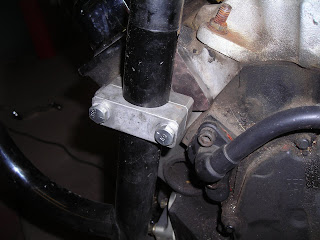
Another thing that bothered me is the big ol' gaposis between the steering neck and the front of the tank. It is even more pronounced on the big block bikes. Today, I cut out a couple of pieces of steel and welded them in place between the neck and the tank mounts. This will look much better than staring at the wiring harness and all of the other, assorted dohickeys under the tank. BH should step up their game and pay more attention to detail on bikes in this price range. There are new players now and their bikes have no loose ends whatsoever.
Another rider filled in the tank tunnel with a piece of expanded mesh. It looks pretty nice, but I have another idea. Mine's not, necessarily, better than his, just different. I want to be different, just like everyone else.

Tuesday, December 7, 2010

Tune In, Turn On and Drop Out


No, Dr Leary isn't back from the dead. While the bike is apart, I decided to add a drop out crossmember. This modification allows the oil pan to be removed without dismantling the bike. This is not my innovation. It has been done a number of times before I came along. I was advised by another Boss Hoss guru to use VW exhaust flanges. I went to my, local, muffler guy and asked for some. He said he cannot get them any longer because VWs are obsolete. He's been in the business for many years, so I didn't argue with him. I jumped online and found them for 8 bucks each. Now, Jack and Mary Ellen La Fong didn't raise any fools, so I saved my 32 clams and made my own out of a hunk of 2 X 1/8" flat stock that I already had. Hole sawed them out, drilled a 5/16" hole in each corner and there ya go. I could have made 2 or 3 hole flanges, but 4 holes was easier and faster. The, somewhat, tricky part was cutting the crossmember out. I remembered an old trick for cutting tubing nice and square freehanded. Wrap a worm drive hose clamp around the tube, snug it down and use the edge of the clamp as a guide. My Sawzall took a dump, so I used a jigsaw with a fine toothed metal cutting blade. This all needs to be done with the frame still bolted to the engine so alignment is maintained. The flanges were bolted together in pairs, slipped over the stubs on the frame and the severed crossmember was put back into place. The flanges were then slid so one was on the stub and the other was on the crossmember. After everything was square to the world, all four flanges were tacked in place. The crossmember was then removed and the flanges were securely welded in place from the inside for a clean look.

Tuesday, November 23, 2010

You'll Put Yer Eye Out, Kid


I received a call today from another BH tinkerer. His first words were, "Yer gonna kill yerself with those mounts." It seems that my assumption about the mounts and their intended function was all wrong. They are not there to keep the engine from moving up, down or around. They are to keep the frame downtubes from bowing out towards the front of the bike. It makes sense to me. So, I grabbed the ol' die grinder and off they came. He sent pictures to me some time ago of his mounts. They are nice, but he has different heads than I do and he doesn't have the same bolt holes as mine. Still, I should be able to come up with a similar setup. Time for some more head scratchin'

OK, boys and girls. I laid awake for almost 10 minutes last night and came up with, what I consider to be, a solution to the various issues that have been raised by experienced bikers, fraidy cats and naysayers (BTW, stop saying nay). There will be no welding on the frame and the mounts will be rigid enough to stop any, potential, movement in any direction. I have finished the right side. I cut a piece of 1/2 plate and drilled it to match the holes in my head (no, not that one, smartass). Using the original BH mounts, I drilled and tapped two more holes in the plate to match up with the holes in the mounts. The left side will be, somewhat similar, only with a much thinner plate bolted to the head because of the cylinder offset.

Later that afternoon.
Finished the left side. Since it is too thin to tap threads into, I welded a short, threaded bung onto the plate for the outer bolt. The other bolt goes through the plate and into the head. The BH mount lined up almost perfectly with the hole in the head. I just had to ream it a bit for wiggle room. All of the exposed bolts will get proper spacers to insure that the mounts all suck up tight to the heads.

Friday, November 19, 2010

Mounting Pressures


While I'm tearing things down to the bone, I am trying to address every, little weak point that these bikes have. One has been, for many, the top mounts. Some have reported manifold leaks due to the original mounts being bolted to the intake manifold. I have noticed that I need to tighten mine fairly often. They now reside in the used parts bucket. Whenever I go to my favorite metal supply, I grab a hand full of mounting tabs (I used them for my tank mounts)and triangular gussets. They always seem to come in handy for various projects. With just a tiny bit of trimming and one hole each the gussets were perfectly sized to make these new mounts. The left side bolts flat to the head and the right side uses a spacer because of the offset cylinder head. Clean and simple. I was, initially, going to use just one mount on the left side. The two banks of the engine cannot move independently of one another, so one would probably do. I just couldn't stand the asymmetry. Additionally, this will quiet the naysayers who will warn of catastrophic failure, such as, "The bike will rip itself in half the first time you get on it hard."
I will need to redo the radiator mounts since they went away with the factory motor mounts. I imagine a couple of the aforementioned tabs will do nicely.

Saturday, October 30, 2010

Tanks For Nothing


If you pull your own wrenches, one of the most onerous jobs on a Boss Hoss is the removal of the gas tank. I intend to resolve that problem with a few easy modifications and a few home brewed parts. The first of these parts are two of these aluminum buttons (shown on the tile counter) that I made on my lathe. I measured them, mostly, by eye. The only semi-critical measurement was the small diameter, so that a short piece of 3/4" heater hose would slip on snugly. These bolt to the front mounting tabs of the tank and fit into these "C" shaped brackets that bolt to the original tank mounts on the frame. They will be welded in, later, since the weight of a full tank of gas plus the bouncing and vibration will, certainly, cause them to drop down. At the rear of the tank I tossed the original Adel clips (can you say Mickey Mouse?) and welded in permanent tabs that align with the tank mounts. All were drilled to 1/2 inch. I machined two more buttons with a half inch diameter that slides into the two tabs and locates the tank. I went to my local surplus house and picked up two of these quick release pins. They are 7/16 inch diameter. I drilled the buttons 7/16ths to accept the pins. I did not want to rely on the pins alone to hold the tank. I was afraid that the weight and vibration would damage them, so this is why I made up the little buttons. A washer with a 7/16 hole will be tacked to the backside of the frame mount so the pins will be able to lock in securely. Tank removal should take about 15 seconds.

Sunday, October 17, 2010

Deja Vu All Over Again

Again, the bike sits in the same spot as it did when I began this blog, torn down, it's guts exposed to the prying eyes of the world. This is the final, planned, dismemberment. The primary focus this time is to put the belt drive back on, complete the mechanical fuel pump installation that I began a few months ago (I'll 'splain in a later post), replace the shifter with something nicer, clean up all of the welds and assorted boogers, paint the frame and side covers and reassemble the whole thing with an eye towards detail and eliminating any unnecessary stuff. I have all winter, so I plan on taking it, fairly, slow and getting it right. Plus, I still ain't got noooooo money, Honey, so I'll be collecting aluminum cans and selling blood to fund the project

Saturday, September 18, 2010

Cajun Carl's Stringworks and Gumbo Emporium


I, recently, had a visit from my middle brother, the mysterious and legendary Jeff LaFong. I haven't seen or heard from him in five years or so. The 60s shaped his personality and he never quite left. When the Beatles and the Beach Boys were new and exciting, he picked up a guitar and never put it down. He is now a pretty good bluesman with a bent towards the slide guitar. During the course of his visit, he asked me if I knew anything about cigarbox guitars (CGB). I told him that I did not. I can set the stations on my car stereo, if I have the manual in my hands. That is the extent of my musical talent. He said that they were what the old bluesmen used years ago, during the depression or if they, like me, were Po' Boys and couldn't afford a mail order $4.95 geetar from the catalog. He wondered if I would be able to build one for him. I am a, fairly competent, woodworker. I did a bit of, on line, research and was fascinated by the whole culture, the ingenuity and the raw, beautiful sounds that guys are getting out of these primitive, homemade instruments. http://www.cigarboxnation.com/ I went to the local seegar emporium and bought a couple of boxes and went home. I had a stash of maple that I salvaged from some discarded church pews plus my buckets and boxes of scrap wood. The neck is maple with a walnut fretboard laminated on, the tuning pegs are dowels with walnut knobs. I reamed the holes for the pegs with a taper reamer and tapered the pegs to match, much like violin pegs. Most of the CBG builders buy the tuners, but I decided to do it as close to the way a guy would have done it in the 30s. There are no frets, yet. I noticed that some of the guys play them fretless, so I'm going to send it to Jeff as is. It is really a prototype and I need his input. I don't even know how to string it up, so I'm taking it to a friend to see if it will play. One variation in the nostalgic theme is, this CGB is electric. In keeping with the lo buck idea, the cost of electrifying it was about 6 bucks. The pickup is a piezo buzzer from Radio Shack and a 1/4" standard jack. Some genius (there are others, but only one Boy Genius™) discovered that if you take one of these buzzers and apply 12 volts to it, oddly enough, it will buzz. But, if you cause the unit to vibrate, it sends a small electrical charge back through the wire. Voila! Down and dirty pickup. So, anyway, I screwed and glued the whole mess together, sprayed a few coats of lacquer on it and there ye be, one CGB. Unit #1. Again, eagle eyes may note that it only has three strings. The three string CGB seems to be a favorite and the most traditional. What do I know. I couldn't play it if it had one string. Actually, there are one string CGBs. They're called diddleybows. It may go to the dumpster or it may sell on ebay in 50 years for 500K. Who knows. It was a fun build, took all of, maybe, 4 hours and the total cost was well under 10 bucks.

Epilog. November 2. Brother Jeff called to inform me that the guitar is wall art. The neck is too long as well as a few other problems. The good news is that everything else is good. Not being a musician, I didn't know the distance from the "nut" (the little gizmo that the strings pass over as they leave the tuners) to the bridge is critical in order to tune the instrument. I have an old guitar so, this time, I'll use it as a template. I wonder if Stradivarius got it right the first time?

Friday, May 28, 2010

Better Living Through Chemestry and Miscellaneous Ramblings

This morning I took the first of my last round of chemo. Two weeks and I'm done. I'll be pretty good for about a week and then the side effects will kick in. It won't be fun, but I've been there before so I know what to expect. I'm OK with it. It is the price that I must pay to completely regain my health. I just have to keep smiling.

Last night our lovely granddaughter, Alexandria, graduated from high school. It's hard to imagine that our little 2 pound 13 ounce preemie is a woman now. She has been living with us for the past four years so that she could attend a top rated school rather than the sketchy schools near her home. It was a wise decision. She did well, better than I did, by far. I, as you all agree, am a Boy Genius™, but it came from genetics and self education rather than school room experience. She will be moving back home now. We will miss her, but she's a short drive away.

Two weeks ago, twenty people showed up at my door with rakes, hoes, weed whackers and other implements of destruction and cleared my property. Two ladies helped with the chores as well as providing a big ol' pile of grub for the crew. These were all members of my church. This is what Christianity is all about. It isn't the nonsense that you see on TBN, with all of it's magic tricks, annointed dish cloths and pleas for as much of your money as possible from slick hucksters and cotton candy haired, walking cosmetics counters, living in multi million dollar, Newport Beach, mansions. It is about Christ-like servitude. Help people, reach out your hand when someone is hurting, bring them a sandwich and a cool drink. It's easy.

I think, either today or tomorrow, I will take the bike out for a short hop around town before I get sick again. It's a bit windy today, so maybe tomorrow. I've turned into such a fair weather rider. I guess it's from all those years when all I had was a bike. I hate riding in the rain or the cold. Could also be the decline in testosterone levels brought on by advancing old age. Crap!

Wednesday, May 5, 2010

Chemo and Weeds

Here I am, just beginning my second two week regimen of chemo. It sucked pretty good the first two weeks. Lots of pain in my hands and feet and one day (actually, about 3 hours) of feeling as sick as I've ever been in my life. It passed and I feel pretty good today. I expect to be back on the couch by this weekend, however. I had time to do a few, necessary, chores around the house. I reassembled my tractor which had been apart due to a blown head gasket. Put the end loader on today with, what was probably, my last surge of strength. I have 2 1/2 acres of weeds to clear, per fire department regulations, and I need my tractor. I have a gang of friends coming over in a week to do the hillside work. I can't stand or walk the slopes, nor can I handle the weed whacker with my bum feet and paws. Five or six weeks from now, I expect to be back at the top of my game. Granted, it's a bush league game, but it's good enough for me.

Thursday, April 1, 2010

Good News/Bad News

I had my follow up appointment with my oncologist yesterday and was told that, at the time I went into surgery, I was cancer free. The chemo/radiation had completely wiped it out. Surgery was still necessary, of course, so that the tissues could be examined by pathology. So, that is the good news. The bad news is that the doctor want's me to go through another round of chemo as a precautionary measure. I told myself at the beginning of this journey that I would do exactly as the experts recommend. It was a good decision and I'm going to stick with it. So, for two weeks, then a week off and then another two weeks, I'll be poisoning myself again. My previous regimen was for 5 weeks straight at a higher dosage, so I don't thing it's going to be too bad at all. The 5 week deal was a real booger. Plenty of pain and sickness, but some of it was the fault of the radiation. I beat cancer, so a little more discomfort is just another hiccup in my life. When I was diagnosed, nobody told me that I had the fun variety of cancer, only that if I had to get this disease, colorectal is one of the better ones to get. In all, it hasn't been as bad as I would have expected. Top notch medical personnel, lots of support from family and friends and the grace and mercy of God towards a, pretty, wretched sinner. I couldn't lose.

Monday, March 29, 2010

Semi Colon

For all of you that have been following my adventures of late, here is an update. On Monday, the 15th, I went in to the West Los Angeles VA hospital where I underwent a low anterior bowel resection. For the layman, they took out about 8 inches of my colon. The sugery and, subsequent, recovery went well. There was little pain or discomfort. I was sent home on the following Monday, cleared to do just about anything except lifting anything over 10 pounds. I had some rather severe gas pains on that evening and on the following evening as well. By Wednesday, they had subsided. The worst part about the entire deal was waiting for the pathology results. I went back to see the doctor today and was told that all the tissues came back clean and clear of any malignancy. Woo Hoo!! I now join an exclusive club of "survivors". I wonder what the ribbon color is for colorectal cancer? Brown? How about a scratch and sniff? Maybe the world isn't ready for that just yet. I'll shelve it, for now.
A big thanks to all who wrote, prayed, cared or even feigned interest in my plight. It was a real blessing to both of us and we are, eternally, grateful. While this was no fun at all, it was still a good experience. To see so many people come together, on my behalf, made it more than tolerable. Time to get on with the rest of my life. It's lookin' pretty good.

Friday, March 5, 2010

My Most Amazing Post.

I lay around on my dead ass watching, all together, too much T.V. It came to my attention the other day while watching some, pre-digested, dreck on the tube that the word "amazing" has become the most popular word in the English language. Everything is amazing. Celebs roll their eyes in rapture while describing their latest boy/girl friend de jour as being just the most amazing person. I was watching an ad for something or another and the voice over said, "My baby started walking today. It was amazing". What's so frikken amazing about that, you nitwit?!?! If the kid had sprouted wings and started flying around the room, that might have qualified, but guess what? All kids start to walk at some point unless there are physical problems. Amazing! My dog is just so amazing, I have the most amazing job, the cheeseburger that I had for lunch was so amazing. I'm amazed at the, obvious, fact that people are lemmings. They see or hear someone of great value and intelligence like Paris Hilton or K-Fat or some other celeb, Jersey Shore, douche say or do something that's....... well, AMAZING, and they feel the need to emulate them so they can be elevated to a higher plane of existence. Who will be the first to name their kid, "Amazing"? Hmmm, "Amazing LaFong". Has kind of a nice ring to it

Wednesday, March 3, 2010

Barkeep, Gimme Another Belt

I received the belt from Grainger Monday and, sure enough, I miss measured and it was too short, So, back I go and sheepishly admit to the clerk that there is something wrong with my tape measure. Boy Geniuses™ don't make, simple, measuring errors. I return to The Fongderosa with the new belt clutched in my sweaty fist and we have a winnah. I fire up the bike. Parenthetically, I have to give props to my Odyssey battery. I haven't ridden the bike or charged the battery in, at least, 2 months and it fired immediately and without hesitation. I allowed the bike to sit, running, until it came up to operating temperature. No leaks, no apparent problems. It was a cool day and it sat at 180 for 15-20 minutes with no air flow over the radiator. The fan never kicked on. A good run on a hot day will come later. I have surgery in two weeks and there will be a protracted period of recovery. By the time I'm back on my feet, warmer temps will be here and I can give it a baptism by fire. There is no reason to believe it will not work perfectly. I didn't keep a pile of receipts, so I'm not entirely sure of the cost. The pump was about 40 bucks, the belt was 12, I bought a handful of copper fittings and a boatload of charcoal briquettes for my furnace. I probably spent more on those than anything because of the numerous casting failures.
I can now cross Jabsco off of my list of people that I will no longer have to concern myself with. I'm sure they're great folks, but it's not an item that you can just swing by Wally World or Pep Boys and pick one up. This pump has a lifetime guarantee and I suspect that I will never have to replace it.
Now, there is that noisy, sometimes troublesome electric fuel pump. Too bad there is no room for a mechanical pump....................or is there????

Saturday, February 27, 2010


The first pic is the pump, installed and ready to go minus the fan belt. I ordered one from Grainger and need to go pick it up Monday. I filled the system with water and there are no leaks so far. We'll see later on when it's pressurized. All the water in the pic is from my sloppy filling job with a funnel and a coffee can. I'll paint the copper fittings flat black so they "go away" visually. I also installed a petcock at the bottom of the pump to allow easy drainage of the cooling system. Eagle eyed viewers will note that the pic in the previous post shows a chrome 90 degree fitting where the petcock is. I found that when I installed the pump. I had miscalculated and the fitting sat too low. I solved that minor problem by drilling and tapping 3/4" NPT threads on the side of the bump, above the hole on the bottom and used that as the inlet. Not exactly as planned, but at least I didn't have to scrap another pump housing. The light is hanging loose right now because I needed to remove it to install the radiator. The other pic is of the Masonite mounting bracket template/pattern.

Sunday, February 21, 2010


Here is the new pump, pretty much done and ready to mount on the bike. The lower fitting goes to the radiator and the upper feeds the engine. The studs holding it together are extra long because they will also go through the mounting bracket. As you can see, I also cast and machined the pulley. It was a regular deal, no need to elaborate. I got all set up to cut out the bracket and realized I was out of acetylene. After a trip to the welding supply I will get with it. I hope to have it all done and pumping by the end of this week.

Friday, February 12, 2010

Persistance Is It's Own Reward


Yesterday I poured , yet, another housing. I am happy with the result. As you can see, it is a bit different from the original one. I added a bump out on the back for the inlet instead of the flat back. This seemed to be a good idea, but it introduced a few new problems. The first was the issue of shrink defects. I actually poured another one a few days ago and it had a moderate divot on the rear bump. It was a usable casting as is. The defect was more visual than anything else. It upset my eyes to look at it, so I decided to make another. The biggest problem was that the bump made it, nearly, impossible to chuck it in the lathe. It needs to spin on center in both the horizontal and vertical planes to properly finish it. A huge PITA. My solution to both problems was to drill the back of the pattern and use a removable dowel for a sprue. This allows extra metal in the area that is prone to shrink and, since I drilled it on center and perpendicular to the mounting face, the sprue can be used to chuck the housing in the lathe. It worked out just fine and the machining process was a snap. My big problem now is to find the proper bit to drill for the 3/4 NPT fittings. You don't just go to The Borg and pick up a 29/32" blister packed, Chinese cheepo bit off of the pegboard. I think I will try to bore it out. We'll see.
Well, as usual, I screwed up and ruined my beautiful casting. I tried to bore it out and something went awry. The hole ended up egg shaped and too large at the same time. So much for experimentation. I went straight to Ebay and ordered the proper 29/32" bit. I should have it by the middle of next week. At least I have the casting process down to a science. I'm busy tomorrow, so maybe Sunday I will give it another shot. I think I will go ahead and pour a couple of housings, while I'm waiting for my bit to arrive, so I can have a spare. I'm normally not a very patient person so maintaining my cool has been a challenge. So far there has been little cursing and no thrown tools/parts. I can last for only so long, though. I've lost track of the number of pours that I've made.
Today is Sunday. I poured another housing today and it came out very nice. Probably the best, so far. Maybe I'm getting better or luckier. I'll take it however I can get it. I faced it off, bored the cavity out and generally cleaned it up. I will resist any urges to try to drill the inlet and outlet openings until my drill bit arrives. I can ram up and pour one of these things in about 2 hours, but I'm not anxious to do it again. I still have to make the pulley and a mounting bracket. The pulley will be cast aluminum and I will probably cut the bracket out of 1/4 or 3/8 CRS.
The first pic is of the sprue being trued up so I can turn the casting around and chuck up the resulting protrusion and face the housing and bore it to size. The next pic is of the semi finished pump. I just have to drill and tap for the 4 studs that will hold it together and the inlet and outlet. The sprue will be cut off since I no longer need it.

Thursday, February 4, 2010

Introspective Thoughts and Self Flagellation

I've thought about all of the failures that I've experienced while trying to cast the pump housing. Each one was different....sand too wet, melt too cool, core shift, sprue too close to edge causing fall out, etc. I feel that I've educated myself and the next pour will be a good one. Part of the problem was that my flask was too small and I couldn't ram the sand properly or keep the sprue holes far enough from the outside of the sand. Today I built a larger flask, re tempered my sand and, generally, got ready for tomorrow. It's supposed to rain, so it will be a good day too fire up the furnace and pour some metal.

Thursday, January 28, 2010

Overlooking the Obvious in Search of the Obscure

Often, I find that my superior intellect interferes with my ability to see what is in front of my face. It is the curse of being a Boy Genius™, I suppose. The #3 housing would have worked perfectly well had I not drilled it in the center for the inlet fitting. I did it because it was expedient, since I had it chucked up in the lathe, anyway. Had I drilled it off center, into the area where the impeller vanes are, it would have worked just fine. The coolant doesn't care how it gets in. In the stock, MoPar configuration, the entire backside of the impeller is in contact with the coolant. All that really matters is that the outlet be at the periphery of the housing, since the centrifugal action of the impeller forces the flow to the outside. In the next couple of days I will pour, yet another, casting. As long as I don't try to reinvent the wheel, I expect the next one to be the last.

"You can't always get what you want, but if you try sometimes, you just might find, you get what you need." Micheal P. Jagger

Tuesday, January 26, 2010

*&%$*$@!!!!!!!!!


Well, tomorrow is another day.
I failed again, but it was entirely my fault. I stopped in the middle of a pour and got a huge gas bubble that didn't show up until I was boring out the back for the inlet fitting, which was the last step. I couldn't have found it before I spent several hours machining it. NOOOOO, that would have been too easy.

Monday, January 25, 2010

Snatching Defeat From The Jaws of Victory


Figuring that the third time is the charm, I rammed up the mold and poured another housing today. The casting came out very nice except for a few ragged edges at the parting line. No big deal, a few swipes with a file and we're lookin' good. I chucked it up, faced off the front and back surfaces and bored it out to accept the pump. So far, so good. As I stood there looking at it and feeling pretty smug about my limitless talents, I realized that there wasn't enough clearance at the rear of the pump shaft to allow coolant to flow in. The shaft nearly touched the inside of the housing. If I counter bored the housing to allow room for coolant to pass by, it would be too thin. Rats!! What I did was to attach a disc of 3/4 plywood to the back of the wooden form. This will give me enough meat to counter bore for coolant flow and the housing will still be thick enough to drill and tap for the 3/4 pipe threads needed for the fittings that will connect to the radiator. I forget how many light bulbs Tom Edison built before he got one to work, but it was more than four. Tomorrow, I will have a working pump housing

Saturday, January 23, 2010

Prometheus Tamed


Today I rammed up the pattern for the water pump housing, fired up the foundry and chucked in a couple of old pistons and a top fork crown from an old Honda ATV. In 25 minutes or so I had a nice crucible full of molten aluminum. As I poured it into the mold, my gut feeling was that it was going to be a bad pour. I was wrong. It was a horrible pour. I think the sand was too wet and steam filled the upper part of the cavity instead of the alloy. No big deal. I'll allow the sand to dry out a bit and try again later. It's been about 5 years since I messed with the hot stuff, so I'm a little rusty. I have plenty of time and the cost is next to nothing, so I'll keep on trying.

The second pour was another failure. Not as spectacular as the first, but a failure nonetheless. I didn't allow the aluminum to get hot enough and it began to freeze in the crucible as I poured.
Though I melted enough metal, I came up short and the mold didn't fill completely. All was not lost, however. The casting is unusable but, other than a large hole in the back of the housing, it came out rather nice. Let's hope that the third time is the charm. If I had a pyrometer, I could avoid the guesswork but it's not in the budget. They didn't have fancy stuff like that 100 years ago and they did OK.
It's too late today to do another, so I will have to wait until tomorrow. Stay tuned.

Friday, January 15, 2010

I Hate Meeses To Pieces


I live in a semi rural area, surrounded by brush and many large open fields. As a result, mice are a problem. They get into my shop, leave turds everywhere, chew up anything that I leave out, and generally make my life miserable. I put out bait and spring traps with varying degrees of success. The bait disappears, yet I never smell any decomposing critters. The traps work pretty well and I will continue to use them.
I saw this contraption on the net a while back, so I thought I'd give it a shot. The soda can is baited with peanut butter. When Mickey and Minnie crawl up the ramp and try to dine on it, the can spins on the rod and deposits them into the pool. I could have left out the water and disposed of them "humanely", but I don't give a rats ass (pun intended). Die, fricken' vermin

Wednesday, January 13, 2010

Wooden It Be Nice?


Finished making the pattern for the pump housing today. As I stated before, it is three pieces of 3/4 plywood sandwiched together. I used the gasket to trace the shape and I bandsawed it out. The recess was made with a circular pattern and a router. I used my spindle sander to smooth the sides. I tilted the table a few degrees to give it some draft so it will pull out of the greensand mold. I sprayed the whole thing with sandable primer/surfacer and coated it with automotive, lacquer based, spot putty and sanded the whole thing smooth. Another couple of coats of the primer, a bit of finish sanding and there ya go, one pattern. I'll wax it before I ram up the mold. The recess was made slightly conical with some Durham's Rock Hard Water Putty so it too will have sufficient draft to release from the sand. I could have left out the recess and machined it, but that's a lot of extra work
While I was whittling, I made a pattern for the pulley. I could have gone to Pick a Part and, possibly, found one that would work. I figured I could make one in less time and for free. Plus, I get extra bragging rights for making my own stuff.
Today I got some pictures emailed to me by a V-8 biker that built a pump similar to mine. His and mine are almost identical. Since I consider him to be a bit of a genius (though not a Boy Genius™), I feel my design is a good one and should work flawlessly. He also offered some suggestions to make the entire unit more compact. Since this would involve machining the pump housing, I have opted to keep the original size pump. I expect that it will never give me a bit of trouble, but if it does and I need to change it, I don't want to have to cut down another pump, especially if I'm stuck in the middle of nowhere.

Tuesday, January 12, 2010

We Will Pump You Up, Girlie Men


Well, today I started the, much anticipated, water pump project. My goal is to build a belt driven pump, using an easily available automobile unit. I have never trusted the Jabsco pump that BH uses. If it conks out, you're screwed unless you're near a marine supply house or you carry a spare. I searched for quite a while for a fairly compact pump with a simple round housing. I finally settled on the Chrysler 383/440/Hemi unit. As it turns out, I was not the first to "discover" the MoPar unit. Another V-8 biker also has experimented with it with good results. There is also a remote mounted pump for V-8 Porsche conversions that uses it, so, it would seem, I'm in good company. I whistled down to my local parts house and they ordered it for me. I had to wait an agonizing 1 hour for it to arrive. Upon getting it home and having a look at it, I think it will be an easy and fun project.
The first thing I did was to glue together 3 pieces of 3/4" plywood for the pattern for the housing. I will be casting it from aluminum using my little foundry furnace. Plywood isn't the best material for patterns because of the rough edges. I will have to spend a bit more time finishing the edges with putty and getting it nice and smooth so I can pull it from the sand mold.