
Monday, May 11, 2015
Mother's Day and Family Treasures
I finished this today, one day late for Mother's Day. There is a back story, of course. Years ago, when I was, maybe 9 or 10 years old, my mother announced that she was getting "The Spice Rack". She was very excited. It seems the rack belonged to an aunt and Mom was promised that it would go to her upon the aunts passing. When she brought it home, my dad mounted it to the kitchen wall, where it hung until 1971. That's when the story takes a tragic turn. 1971 was the year of the Sylmar earthquake. The spice rack did not fare well. Most of the jars fell and were shattered into hundreds of pieces. Mom was devastated. She had only a few prized possessions and it was, probably, at the top of the list. When she died in 1996, I was given many of her belongings. I didn't realize that a few jars survived. She had, carefully, wrapped them up and put them in a box. Now we fast forward to the 21st Century. I was able to go online and after several years of searching, I found a few, matching, jars. I now had enough to arrange them in a symmetrical, balanced display. Originally, there were quite a few more jars, perhaps 10 or 12 of the large ones and 16 or 18 of the small ones. Knowing that finding more was going to be difficult, I used what I had. Some, notably, the oil and vinegar bottles are chipped. I'll think of them as battle scars. I made up this shelf to display them. They will also hang in our kitchen. This time, I will use liberal amounts of museum putty to secure them to the shelf so, when the "Big One" hits, they will stand a chance of surviving. I wish I had been able to do this while she was still alive but I'm sure she would love it

Thursday, May 7, 2015
Rocket Science
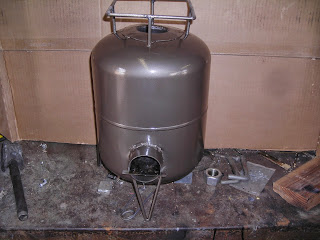
My grand daughter had a birthday recently. Of course, there were balloons everywhere. I noticed the empty helium tank and thought it was a waste to toss it out. I know that it, probably, gets recycled, but I wondered if it could be repurposed. I got on line and saw these rocket stoves. They can be made from old cans, propane tanks and so forth. So, I got to work. I cut a hole in the top, where the valve was and another on the side. I took a piece of exhaust tubing from the scrap pile and cut it in half at a 45 degree angle I welded the two pieces back together so theye mad a 90 degree turn. I stuck it into the tank so one end came through the hole on the side and the other end poked up through the hole on top. I welded the tube to the tank at the side opening. Before welding the top closed, the tank was filled with vermiculite. This insulates the stove and keeps as much of the heat as possible in the firebox and the chimney. I made up a little, square grille to hole the pot or pan and three legs to support it. The horizontal tube is the fire box. A small sheet metal divider was cut and inserted in the tube. The wood sits on this divider. As it burns, air is drawn in through the bottom of the tube, under the divider and the heat pulls the flame up through the chimney. I fired it up and was able to fry an egg with it. I find that lighter wood, like pine, seems to work better that slower burning hardwood. It's nothing that you can just light and walk away from. Fuel needs to be added often, but it works pretty well. Just another, quicky, project that I threw together because I was bored and broke. As soon as I scrape up a few bucks, I'll finish the wood lathe


Sunday, May 3, 2015
Time For A Rest
Next, I need a tool rest. I deviated from the plans again. The original plans assume that the builder has no metal working tools. I do. It called for an assemblage of various pipe fittings and other, store bought, hardware. I knew that it would look hokey and homebrewed, so I devised my own rest. The base was made from two pieces of oak, laminated together, much the same as directed in the book. After that, I was off on my own. I machined a collar from some aluminum that I had in the scrap bin. It was drilled and tapped and attached to the base with 1/4 inch screws. It was bored through to 3/4 inch. Another hole was drilled through the side and tapped for the locking screw which I added a little, turned handle to. The tool rest itself is simply two pieces of 3/4 inch cold rolled welded into a "T" shape. I can always make up a new rest for different situations. I'm sure this one will do for 99% of all the turning that I will do. I made up another handle on my small lathe to lock down the rest assembly to the lathe bed. The original plan called for a wooden hand wheel but I thought this will work just as well. Also, I have a hand wheel, in my junk bin, that I will use for the tail stock and I don't want a mismatched set

Subscribe to:
Posts (Atom)