A while back, I modified my throttle shaft to allow my carb to open all
the way. It worked well, for a while. I noticed that it still wasn't
going WOT, so I moved the ball fitting a bit closer to the center line
of the throttle shaft. Much better.......until last Saturday. I was
riding along and the throttle stuck in the idle position. I jury rigged a
fix and was able to finish the ride. Upon getting home, it was evident
that the pull on the cable was almost passing across the center of the
shaft. No good, at all. I brainstormed it, for a while and decided that I
needed something like most bikes have, a circular drum that allows the
cable to pull, regardless of the distance from the butterfly shaft. I
tossed a hunk of aluminum in the lathe and whipped up this gizmo. It
screws to the throttle shaft via a sheet metal strap that I riveted to
it. The cable slips in a radial groove on the edge of the drum and is
secured in the open hooked hole. After a few tries, it works slick as
snot on a brass doorknob. I only had to deepen the groove a tad more to
get WOT. The deeper the groove the quicker the action.
A continuing journey into the psyche of Carl La Fong, world traveler, jack of all trades, soldier of fortune, adviser to kings and potentates and lover of beautiful women. All opinions are those of Carl. The author is to be held blameless for any death or dismemberment that may result from following any of the procedures contained herein. "What the world needs, is more geniuses with humility. There are so few of us left." Oscar Levant
Saturday, April 23, 2016
Monday, April 11, 2016
Buttoning Things Up
I finally rode the bike today. It ran OK, but still not what I was hoping for. I returned to the shop, figuring I would tinker with the timing and carburetor adjustment. First, I decided to clean up a bit. Put tools away, sweep the floor, do some light house keeeping. As I was sweeping the floor, I noticed a small object being pushed into the dustpan. Further investigation showed it to be the contact button from my distributor cap. The spark had been jumping 1/2 inch, from the coil to the rotor, instead of traveling through the contact. Not good. I yanked the cap off and put the button back where it belongs. The bike fired right up and ran so much better. The idle was better. I reset the timing and all seems well, at this point. I'm so glad that I noticed that button, as I was cleaning up. I would have chased my tail forever, trying to figure out the problem
Thursday, April 7, 2016
Joining The Reserves
I finally got all of my ducks in a row and fired up the bike. I only ran it for 30-40 seconds. The pump seems to work well now. I was surprised to see the amount of gas that flowed from the idle bleed line. I had it running into a can and it pumped a quart, or so, into it. I thought it was no big deal, and I'm sure it is normal. Normal for a standard installation, that is. As we know, this is far from normal. I soon realized that there was a big problem. Let's back up a few years. When I added the pump, I also added a three way valve. On, off and reserve. It has worked flawlessly. When I run out in thee main tank, I would reach down and switch to reserve. Easy Peasy. Now it is very evident that this will not work anymore. Why, you may ask. The culprit is the idle bleed line. When I switch to reserve, the pump will draw from the reserve tank as it always did. However, and this is a big however, the idle bleed line will still flow the excess gasoline into the main tank. I estimate this will take 2 or three minutes and then my reserve tank will be sucked dry. Now, I could then, switch back to the main tank but this seems ponderous and Mickey Mouse. So, what I did was re engineer the fuel lines. The three way valve went into the parts stash. I ran a line from the main tank to the fuel pump suction side. I teed into that line and ran another hose from the tee to the reserve tank. In between the tee and the reserve tank, I installed a small, electric fuel pump and an electric shut off valve. When I run out of gas, I just flip a switch, the valve opens and the fuel from the reserve tank is pumped into the main tank. After 5 minutes, or so, I can switch it off. That's it. Nothing else to do but to look for a gas station.
Friday, April 1, 2016
Error Begats Error
Some would call it a comedy of errors. I prefer tragedy. I seems all of my, carefully diagnosed problems were misdiagnosed. I did not need a new cam. I did not need a new fuel pump push rod. So far, it would appear that it was, after all, a fuel pump failure. I sent off for a kit to rebuild it. I contacted the manufacturer and the inventor of the pump. He said I need to run an idle bleed line. This is a line that runs from the regulator to the tank. A return line. My tank has just one fitting, the outlet. He told me it has to be plumbed so that the gas enters the top of the tank. Fine for a car, bad for a bike. I thought about running a tube up through the bottom of the tank that almost touched the inside, top of the tank. I later felt that it would be awkward to get at and would negate the quick release tank setup that I showed in an earlier post. I finally thought, why not just drill a hole in the top of the tank and solder in a bung to accept the return line. It would be right there in front of God and everyone else to see. Sort of a form follows function, industrial, racer tech look. Here is how it turned out. of course, the paint suffered, but it's acrylic lacquer so it's an easy fix. I drilled another hole in the top of the neck and ran the hose through it and down to the regulator, which is just at the juncture of the neck and the front down tubes. I also fabbed up a little plate to hold a rubber grommet to keep the hose from chafing. I like the look. no nonsense and purposeful.
Thursday, March 3, 2016
Time For A Slice Of Humble Pie
Well, the "Boy Genius"™ blew it. When I did the new fuel system, with the mechanical pump, I thought I had done everything right. The bike has been running for quite some time and I've been very pleased with it. In the past month, or so, I've noticed it was running a bit rough. I attributed it to the carburetor. I have a core in the shop and all of the parts, except a small spring kit, to do a performance rebuild. It may, or may not be up to the standards of a Quadrajet guru, but it should be far better than what I have now. However, the carb may not be to blame. The bike quit on me. A quick roadside diagnosis revealed there was no fuel getting to the engine. Again, I trailered it home. I yanked off the pump and a bench test showed that it was fine. This left one last cause. The one that I had least hoped for. I knew that a billet camshaft requires a brass tipped fuel pump pushrod. I bought one and dutifully installed it, when I did the mechanical pump conversion. What I, stupidly, did was to install it backwards, with the brass tip on the pump end. The hardened steel pushrod wiped out the cam. So, today was spent tearing down the bike to access and remove the camshaft. Not a horrible job, but not one that I relished. I about 2 hours, the cam was laying on the floor. I have a replacement on the way. This will also allow me to fix a seeping front crank seal that has been misting the sides of the bike with oil for a year or so and to touch up and address some other cosmetic issues.
Thursday, February 18, 2016
It's The Pits
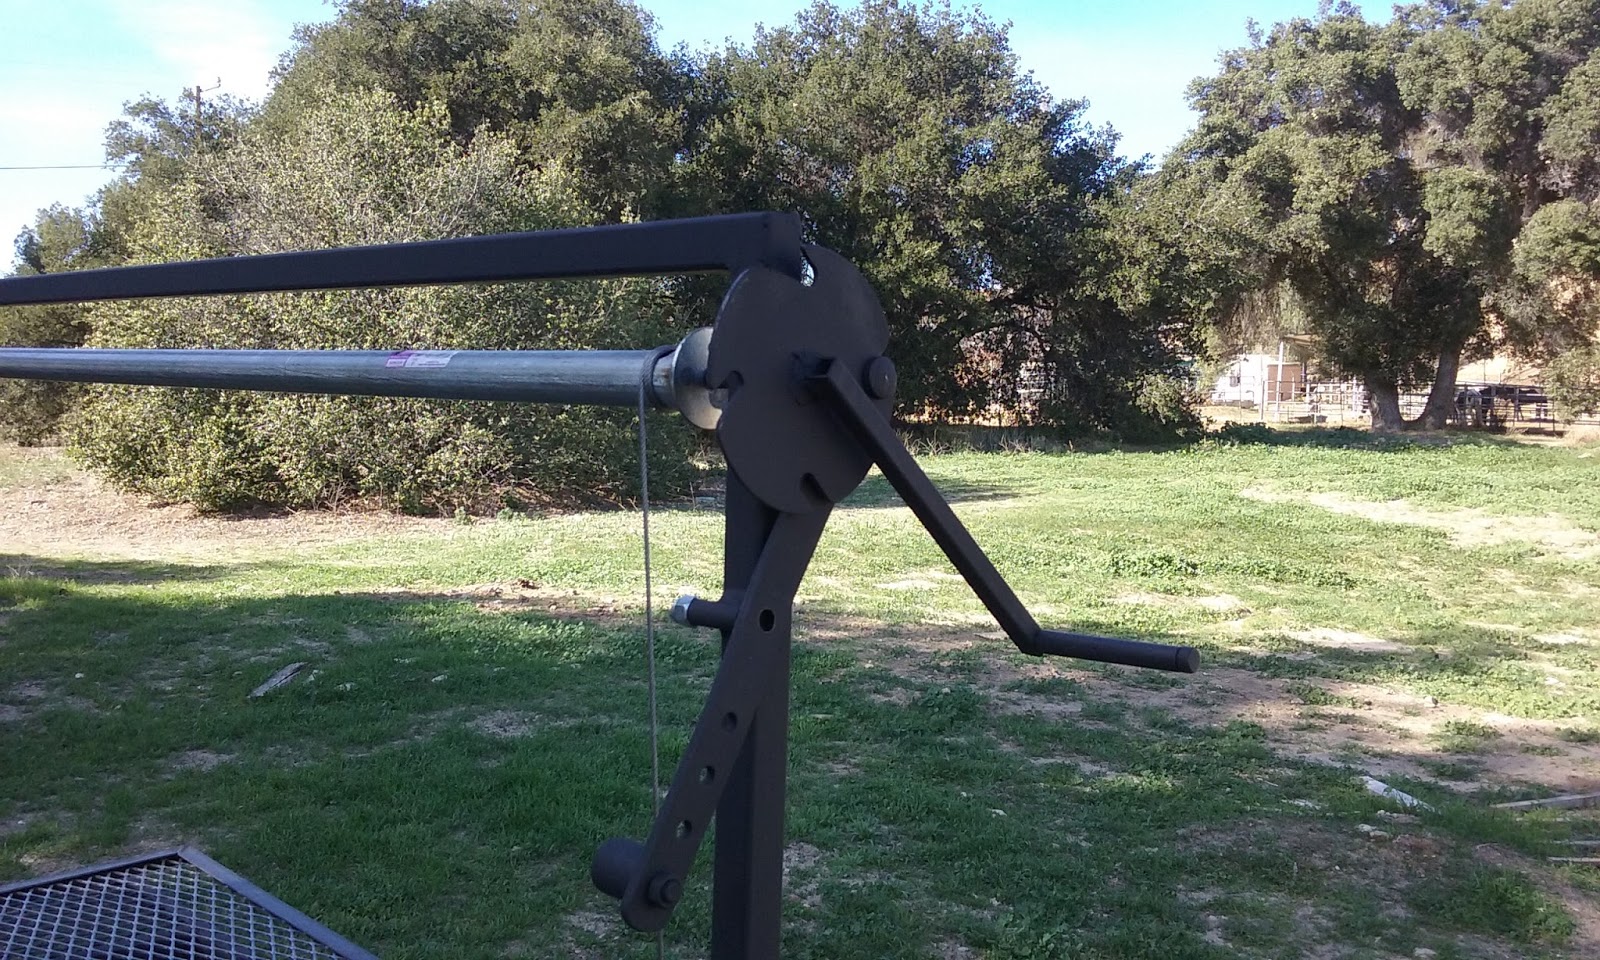
I was approached, by my church, and asked if I could build a barbecue grill. They liked the one that I built, several years ago, for another church. We decided that it didn't need to be as large as that one. I settled on one that has a 60X30 cooking surface. The frame was welded up, using 1 inch, 13 gauge square tubing. The fire box is 10 gauge black iron. I bough a 4X 8 foot sheet. I had the metal supply cut it to 30 inches and the remnant cut in half which gave me two 9 inch strips. This was money well spent. A full sheet weighs too much for me to handle. The 30 inch by 8 foot piece was about as much as I could deal with. I made the short cuts with a torch. I then had one 30X60, two 9X60 and two 9X30 pieces which I welded up into the box. It was then welded to the frame. Time for the grill. This is the third BBQ that I've built. The first two had grills made from 1/4 inch rod. It was tedious and expensive. I opted for expanded mesh this time. I made a frame from 1 inch angle iron and welded the mesh to it. I also used some of the mesh, on each end, to serve as places for all of the stuff, like utensils, condiments, gloves and so on. The lift mechanism just evolved, no real plan. I used more of the 1 inch square tube to make the mount for the crank and all the attendant stuff that goes with it. The roller is a piece off EMT capped off on each end with large, flat washers with captive nuts welded to the inside. The crank is welded to a bolt that threads into the end of the roller into the captive nut. I cut a disc from some of the 10 gauge. It is about 6 inches in diameter. I drilled four 3/8 inch holes in it at 90 degrees. With a hacksaw, I cut slots so it will act as a ratchet. The pawl engages the slots as the crank is turned. Each notch raises the grill about 1 inch. To lower it, you lift the weight on the end of the pawl and crank it down. It works pretty well. I used 3/32 steel cable, which should be plenty strong. Initially, I planned on wheels at one end and just lifting the other end to move it about. This thing weighs a ton, so I dug some heavy duty casters out of my stash, cut some mounting plates and welded them to the legs after cutting them down to allow for the height of the casters. Much better. A good coat of high heat paint and another project is done. The members were very pleased with it. I know it will get put to good use. We're an eatin' church
Monday, February 1, 2016
You Can't Be Too Thin, Too Rich...........
......or have too many clamps. I watched a video on making your own clamps. One person commented that, as nice as they are, you can go to Harbor Freight and buy them for about five or six bucks each. I disregarded this as the rantings of someone who would rather take out his debit card than build something he would be proud of. I opted to build my own. After about 8 hours, I tend to agree with the skeptic. Here is what I have, so far. I need to buy some more all thread in order to finish the last two clamps. They work well, though they are slow and a little awkward. Commercial clamps have screws that are half left threads and half right threads. This allows them to open and close twice as fast. Also, you can spin them by holding both handles. These require spinning each handle separately. However, they do work and they work well, so they are a success, with some reservations. Will I build more? No way. I'll get the ChiCom Harbor Freight cheepies.
Just a brief overview of their construction. The jaws are two thicknesses of 1/2 plywood, faced with maple.
I cut 5/8 steel rod into 2 inch lengths. They were drilled. half of them to 3/8 and the other half to 5/16. Those were tapped to 3/8 NC. The handles are walnut with 3/8 coupling nuts epoxied into holes bored in the ends. They are double nutted onto the all thread. There were a few more minor steps that I won't bother entering since if you do decide to build your own I don't want to be held responsible for your frustration. At least I can say that I built them myself. If anyone asks, I'll tell them it was a piece of cake
Just a brief overview of their construction. The jaws are two thicknesses of 1/2 plywood, faced with maple.
I cut 5/8 steel rod into 2 inch lengths. They were drilled. half of them to 3/8 and the other half to 5/16. Those were tapped to 3/8 NC. The handles are walnut with 3/8 coupling nuts epoxied into holes bored in the ends. They are double nutted onto the all thread. There were a few more minor steps that I won't bother entering since if you do decide to build your own I don't want to be held responsible for your frustration. At least I can say that I built them myself. If anyone asks, I'll tell them it was a piece of cake
Subscribe to:
Posts (Atom)