Friday, July 31, 2015

Finished

I officially pronounce the lathe, done. I made a knob for the spindle lock, a shelf for the right pedestal, tuned up the tail stock height, put a bend in the tool rest to get it closer to the center line and finished the lid for the sandbox. I added 150 pounds of sand. The ballast really makes it solid and it runs very smooth and quiet. I want to get a good sized piece of burl or crotch wood and try to turn a fancy bowl. We are taking an RV vacation in a few weeks so I am going to keep my eyes open for some local wood. I still need some sort of holder for my chisels. I'll have to find something that I like and that also matches the machine.


Tuesday, July 28, 2015

Pick Up Yer Room, Kid

An old friend asked if I could use a roll away box and top chest as he is paring down. I, on the other hand am a tool junkie, so the answer was, "Of course." What I ended up with is a generic lower with two drawers and a large bin and an old Snap-On, five drawer, machinists chest. I already have a roll away with an intermediate and a top chest for my mechanics tools. I wanted to better organize some of my woodworking tools. Once I got it home, I lined all of the drawers with rubber liner. I put all of my planes on top and most of the oft used tools in the drawers. I am not very organized and many of my tools have no home so they lie about wherever I used them last. Hopefully I can break some old, bad habits and put things away when I'm done with them. One can only hope.


One Good Turn


Today, I was able to turn the machine on and make a test cut. I haven't added the sand ballast yet, so I thought there would be a lot of vibration. It runs pretty smooth as is. With the ballast it should be rock solid. One thing that I discovered was that the tool rest needs some fine tuning. I am not able to get it close enough to the work when doing smaller diameter turnings. I will bend an offset on the steel rest or make another, if I have enough 3/4 bar stock. I am sure I will be making additional rests, as time goes on, for bowls and other special jobs. As it is, I am quite pleased with the lathe. Tomorrow, I will finish the cover for the sand box with some oak trim and fill it with sand. First, I have to clear out a semi permanent home for it as it will be too heavy to move with the ballast. I still have to make the spindle lock but I am waiting to see how well the wooden handles work on the tail stock lock and the tool rest. I've cinched them down pretty good and there doesn't seem to be any danger of them breaking. The handle that I made to lock the tool rest to the bed proved to be too bulky. It was clumsy and the long handle made it very hard to  adjust the rest and lock it down. I replaced it with a large knob. I made it by taking a piece of oak and scribing a circle. I laid out for 8 holes on the outer edge. Using a 3/4 hole saw, I cut the holes. The blank was rough cut on the band saw by cutting from the center of one hole to the next. I put it between centers on the small lathe and formed it to the finished shape. I whacked the handle off of the old lock down and glued the knob to the remaining stub. Much better. While I was at it, I made two brass strips for the tool rest base so it doesn't get scarred up. The brass against the oak really looks nice. I wish I had bought brass for the ways after seeing how pretty it looks. My anal self says, "Do it." My practical self says, "It looks fine, leave it alone."

The Wrong Way

I have been focusing on the lathe for the past few days. I have finished all of the fabrication. I stained the oak pieces and sprayed them with 3 or 4 coats of clear. It really is starting to look nice. Too nice. At the beginning, I doubted the wooden ways. I felt that as I slid the tail stock back and forth, the finish would get ruined. I know it is a machine and a tool, but I still want it to look nice. I went to the metal supply and bought some 1/8 X 2 inch cold rolled flat steel. After cutting two pieces to length, I drilled and countersunk a series of holes in them. I screwed them to the ways with flat head screws. Two short pieces were also prepared in the same manner and screwed to the underside of the tail stock. That portion had to be cut down 1/4 inch to make up for the steel ways. It slides very nicely now and the centers are in almost perfect alignment. I think it gives the lathe a more professional look and my finish is protected from scuffs and scratches. Just a few more loose ends to attend to and it will be done

Monday, July 27, 2015

Playing In The Sandbox

It's been a while since I've done any work on the wood lathe. Today I got back on it. I hope to have it done in the next few days. As I said before, the plans called for filling the two bases with sand to give it some weight and to dampen vibration. Of course, I didn't like that idea. Instead I built this box that I bolted to the pedestals. I will fill it with sand after the project is done. I, also, made a lid that will serve as a shelf. I disassembled everything and began to apply the golden oak oil to the hardwood pieces. Once all the pieces have the oil applied, I will spray them with semi gloss clear. The tail end of the bed got a piece of oak, cut to shape, to finish off the bare plywood. After that, all that should remain is to re assemble it and give it a test turning.

Friday, July 24, 2015

Tails, I Win


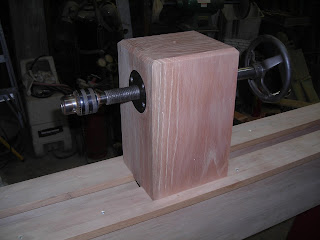
I finally found a few extra dollars, so I made up the tail stock assembly. Like the headstock, it is made of laminated red oak. I deviated from the plans again. They called for the 1-8 TPI nut to be epoxied into a hex shaped recess. I cut the hex shaped recess with a chisel 1/8 inch deeper than the thickness of the nut. I then cut a circular piece of 1/8 CRS with a hole saw. I also cut a 1 inch hole in the center with a hole saw as well. this will retain the nut in the recess, rather than the epoxy. Using a router and a plywood pattern, I cut a 1/8 inch deep recess for the steel retainer. I drilled and countersunk 4 hole and attached it to the tail stock with flathead screws. I put a similar piece on the opposite side to give the spindle a rudimentary bearing surface. The spindle turns very easily and smooth. I then drilled a vertical hole down through the tailstock for the clamping screw. I made another handle, like the one on the tool rest, and epoxied a long, coupling nut in it. This screws into a piece of all thread that, in turn, threads into a clamping block, again, similar to the one for the tool rest. A quick turn of the handle locks the tail stock securely. A 3/8 inch hole was drilled, horizontally, through the tail stock for the spindle lock. I enlarged the first inch of the hole to 1/2 inch and drove in a 3/8 coupling nut. A large washer was recessed flush with the surface to keep the nut from pulling out when the spindle is locked.  All that remains is to procure a belt, stain and spray a finish on the oak and weigh it down. The plans call for filling the pedestals with sand to give the machine stability and to minimize vibration. Of course, I don't care for this idea. I have a better one, but you'll have to stay tuned until next time